 Support & Knowledge
 Updates
 Real Estate Blog
 Open Platform
 Affiliates
 MLS Coverage
How to add IDX to your website quickly and easily to connect your MLS, choose a provider, and display listings on any real estate platform.
Content Marketing Email Marketing Lead Generation
Adding Internet Data Exchange (IDX) to a real estate website is one of the most effective ways to display accurate, up-to-date property listings. This functionality connects your website directly to your MLS (Multiple Listing Service), giving site visitors access to real listings in real time.
Many agents and brokers want to know what is IDX and how to add it to a website, especially when building or upgrading their online presence. The process involves working with an IDX provider, securing MLS approval, and integrating the listing feed into your site.
What Is IDX and Why Does It Matter for Real Estate Websites?
IDX is the technology that allows real estate professionals to display MLS listings directly on their websites. These listings come straight from the MLS database and appear in a searchable format that visitors can easily navigate.
Unlike manual listing updates, IDX uses automated data feeds that refresh regularly. This means when a property status changes or a new listing hits the market, your website reflects these updates without you lifting a finger.
The benefits of adding IDX to your website include:
- Lead generation: Visitors searching for properties can register to save searches or receive listing alerts, creating new leads for your business.
- User retention: People stay longer on websites where they can search for homes without jumping to other platforms.
- Market authority: Displaying comprehensive listing data positions you as a local real estate expert.
IDX works by creating a connection between your website and the MLS database. This connection allows property data, such as photos, descriptions, pricing, and features, to flow directly to your site’s search pages and listing displays.
Key Steps to Connect Your Site to MLS Data
Before diving into technical implementation, you need to complete several preliminary steps to gain access to MLS data feeds:
1. Verify MLS Membership Requirements
To use IDX on your website, you must be an active MLS member. Most Multiple Listing Services require:
- A current real estate license in good standing
- Membership in the local REALTOR® association
- Payment of all applicable MLS fees
- Agreement to follow MLS rules and regulations
Requirements vary by location, so check directly with your local MLS for specific membership criteria and costs.
2. Acquire IDX Credentials from Your MLS
Once you’ve confirmed your eligibility, you’ll need to request IDX access through your MLS. This typically involves:
- Completing an IDX agreement or application form
- Getting broker approval (if you’re an agent working under a broker)
- Paying any IDX-specific setup or recurring fees
- Waiting for review and approval (usually 3-10 business days)
After approval, you’ll receive credentials or access tokens needed to connect your website to the MLS data feed.
3. Choose Your Implementation Method
With credentials in hand, you’ll need to decide how to add IDX to your website. Your options depend on your website platform:
| Website Platform | Implementation Method | Complexity | Setup Time |
|---|---|---|---|
| WordPress | IDX plugin (like IDX Broker or Showcase IDX) | Medium | 1-2 hours |
| Wix | Third-party widget or iFrame | Easy-Medium | 1-2 hours |
| Custom HTML | API integration or embedded solution | Complex | 4+ hours |
| Joomla | IDX plugin (like Buying Buddy IDX or UltimateIDX) | Medium | 1-2 hours |
For anyone debating WordPress vs. Joomla, most real estate professionals choose WordPress because it offers the most flexible and feature-rich IDX integration options.

Selecting the Right IDX Provider for Your Real Estate Website
Choosing the right IDX provider is crucial for a successful implementation. These companies serve as the bridge between your website and the MLS, providing the tools needed to display and search listings.
When evaluating IDX providers, consider these key factors:
- MLS coverage: Ensure the provider supports your specific MLS (not all providers cover all MLSs)
- Feature set: Compare search capabilities, map integration, and lead capture tools
- Mobile responsiveness: Check how listings display on phones and tablets
- Customization options: Look for providers that allow branding and design adjustments
- Pricing structure: Understand setup fees and monthly costs
- Support quality: Research their customer service reputation
Popular IDX providers include:
- IDX Broker: Comprehensive features with strong WordPress integration
- Showcase IDX: User-friendly interface with powerful lead capture
- iHomefinder: Robust search options with good CRM integration
- Diverse Solutions: Flexible widgets for various website platforms
Most providers offer demo access or free trials, allowing you to test their interface before committing. Prices typically range from $50-$200 monthly, with some providers charging additional setup fees.
Setting Up IDX on Your Website: A Step-By-Step Guide
Once you’ve selected an IDX provider and received MLS approval, you’re ready to implement the solution on your website. While specific steps vary by platform and provider, here’s a general implementation process:
1. Install the IDX Solution
For WordPress sites, this means installing and activating the provider’s plugin. For other platforms, you might embed code or add a widget to your pages. Your IDX provider will supply specific instructions for your platform.
During installation, you’ll enter your MLS credentials or API keys to authenticate the connection between your website and the data feed.
2. Create Essential IDX Pages
Most real estate websites need these core IDX pages:
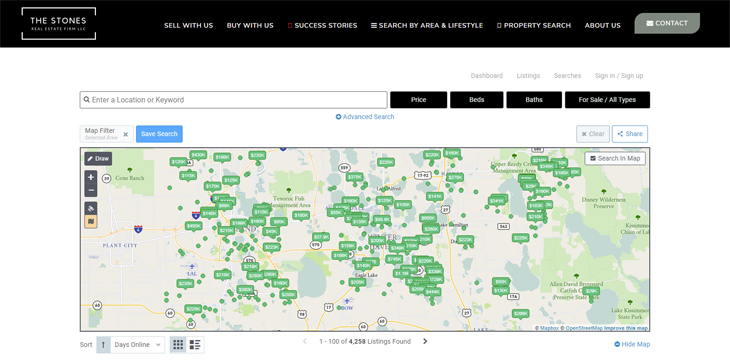
- A main property search page with filters
- A map search page for visual property browsing
- Property detail page templates
- Saved search and favorites pages (if offering user accounts)
Many IDX providers automatically create these pages during setup, though you may need to add them to your navigation menu manually.
3. Customize the Appearance
Make your IDX pages match your website’s branding by:
- Adjusting colors and fonts to match your brand
- Customizing search fields and filters
- Setting default search parameters for your market
- Modifying how listing results display
This step is crucial for creating a seamless experience between your regular website content and the IDX-powered listing pages.
4. Configure Lead Capture Settings
Maximize lead generation by setting up:
- Registration prompts after viewing a certain number of listings
- Email signup forms for saved searches and listing alerts
- Contact forms on property detail pages and other CTAs for real estate websites to guide user actions
- Lead routing rules if you have a team
Finding the right balance is important: too many registration prompts may drive visitors away, while too few might miss lead opportunities.
Maximizing IDX for Lead Generation on Your Real Estate Website
IDX isn’t just about displaying listings—it’s a powerful lead generation tool when configured correctly. Because even one real estate listing can generate multiple leads, placing strategic registration prompts can have a big impact.
Strategic Registration Points
Instead of blocking all content behind registration walls, use strategic prompts that appear:
- After viewing 3-5 property details
- When saving searches or favorites
- Before accessing additional photos or virtual tours
- When requesting showing information
This approach balances user experience with lead capture, allowing visitors to explore without initial barriers.
Automated Follow-Up Systems
Connect your IDX to follow-up systems that nurture leads automatically:
- Set up instant notifications when new leads register
- Create automated emails when new matching listings appear
- Develop drip campaigns based on search behavior
- Track which properties leads view to personalize follow-up
Many IDX providers integrate with popular real estate CRMs like Follow Up Boss and BoomTown.
Enhance Listings with Local Content
Make your IDX pages more valuable by adding:
- Neighborhood guides near listing results
- School information on property pages
- Local market statistics and trends
- Community highlights and amenities
This additional content not only improves SEO but also positions you as a local expert while giving visitors more reasons to stay on your site.
Common IDX Problems and How to Fix Them
Even with careful setup, IDX issues sometimes arise. Here are solutions to the most common problems:
Listings Not Displaying Correctly
If listings are missing or incomplete:
- Verify your MLS credentials are entered correctly
- Check if your IDX subscription is active
- Confirm your MLS membership is in good standing
- Clear your website cache to refresh the data feed
Slow Loading Times
If IDX pages load slowly:
- Enable caching for non-IDX elements
- Consider upgrading your hosting plan
- Ask your IDX provider about performance settings
Mobile Display Issues
If listings look wrong on phones or tablets:
- Test on multiple devices and browsers
- Check if your IDX provider offers responsive designs
- Adjust mobile-specific settings in your IDX dashboard
- Consider a mobile-first IDX solution if problems persist
Search Functions Not Working
If search filters aren’t working properly:
- Reset search configurations in your IDX settings
- Check for JavaScript conflicts with other plugins
- Verify that all MLS fields are mapping correctly
- Contact your IDX provider’s support team
Most IDX providers offer technical support to help troubleshoot these issues, so don’t hesitate to reach out if you encounter problems.
SEO Considerations for IDX Real Estate Websites
IDX integration affects your website’s search engine performance. Understanding these impacts helps you optimize accordingly.
Many IDX solutions use iFrames or JavaScript to display listings, which search engines may not fully index. This limits the SEO benefit of having property content on your site. Look for IDX providers that offer “indexable” or “SEO-friendly” options that create pages that search engines can crawl.
To improve SEO with IDX:
- Create unique content around your IDX listings
- Build neighborhood pages that incorporate IDX search results
- Use location-specific keywords in page titles and descriptions
- Ensure IDX pages have clean, readable URLs
- Add schema markup to help search engines understand property data
Remember that MLS rules require specific disclaimers on IDX pages. These typically include attribution to the listing broker and the MLS, along with the date of the last update. Place these disclaimers at the bottom of pages to maintain good user experience while staying compliant.
Enhance Your Real Estate Website with AgentFire’s IDX Solution
AgentFire’s built-in IDX solution simplifies the entire process of adding property search to your website. Our platform handles the technical integration while giving you powerful customization options.
Key features of AgentFire’s IDX include:
- Seamless visual integration with your website design
- Advanced search filters customized for your market
- Interactive map search with neighborhood boundaries
- Lead capture tools that balance user experience with conversion
- Mobile-optimized displays for all devices
Unlike standalone IDX solutions, AgentFire’s integrated approach means you don’t need to manage separate plugins or worry about compatibility issues. Everything works together in one cohesive system.
Ready to see how AgentFire can streamline your IDX integration with our brand-focused real estate websites? Book a Demo now to discover how our built-in IDX tools can enhance your online presence and lead generation.
Frequently Asked Questions About Adding IDX to Real Estate Websites
How much does IDX integration typically cost for a real estate website?
IDX integration typically costs between $50-$200 monthly plus potential setup fees of $200-$500. Pricing varies based on your MLS region and the features included in your chosen plan.
How long does it take to fully implement IDX on a real estate website?
Complete IDX implementation usually takes 1-3 weeks. This includes MLS approval (3-10 business days) and technical setup (1-3 days), depending on your website platform and customization needs.
Can I add IDX to any type of website platform?
Most website platforms support IDX integration through plugins, widgets, or embedded code. WordPress offers the most seamless options, while Wix, Squarespace, and custom sites may require specific implementation methods.
Do I need technical skills to add IDX to my website?
Basic IDX integration requires minimal technical skills, especially with user-friendly providers. WordPress plugins offer straightforward setup, while custom implementations may benefit from professional assistance.
Will adding IDX to my website help with SEO rankings?
IDX can improve SEO by increasing relevant content and engagement metrics, though many solutions use iFrames which limit direct SEO benefits. Complementary content strategies maximize search visibility.