Google Business Profile is a free tool that helps realtors get found when people search for real estate agents in their local area.
Lead Generation
If you’re a realtor, making your name stand out in your local market feels tougher than ever. There are dozens—if not hundreds—of agents competing for attention, and most of them have a presence online. That’s why using Google Business Profile is one of the smartest moves you can make. It’s free, easy to maintain, and puts your business directly in front of people searching for services like yours.
Whether someone is typing “best realtor in [City]” or “homes for sale near me,” a fully set up and optimized Google Business Profile can help you show up in local map results, establish authority, and turn searchers into clients. Here’s exactly how to make it work for your real estate business.
Why Real Estate Agents Need a Google Business Profile
1. Show Up When People Are Looking for Local Realtors
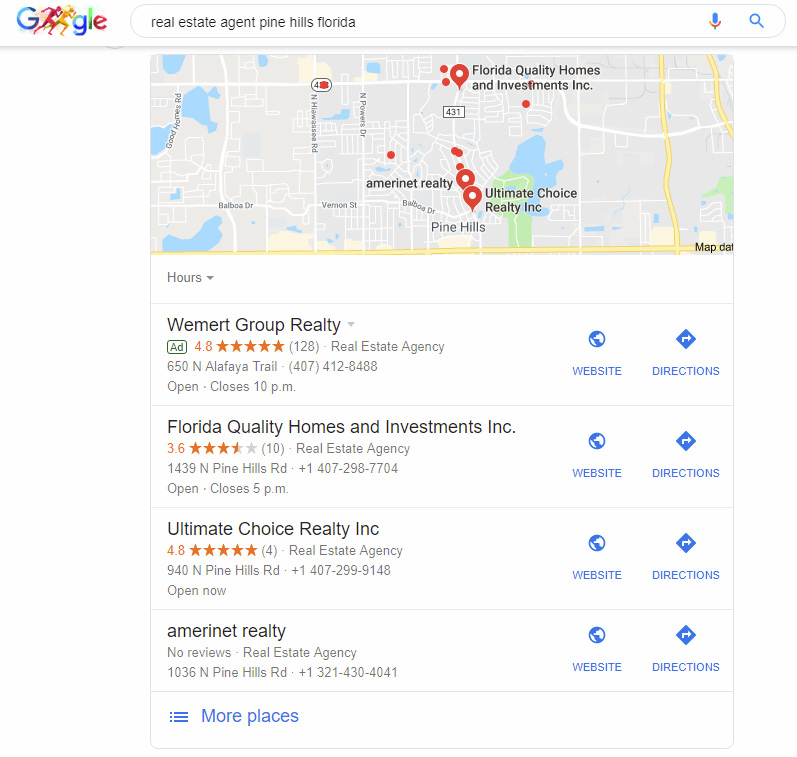
Local search is a huge deal for people who want to buy or sell a home. They’re looking for agents or agencies nearby, and they trust Google to provide the most relevant and reliable options. With an optimized profile, you increase your chances of showing up in the local map section near the top of search results. This visibility puts you front and center for potential clients who are actively looking for help.
2. Build Trust with Buyers and Sellers
When your profile includes high-quality photos, verified contact information, five-star reviews, and up-to-date posts, it immediately helps build credibility. People trust businesses that display prominently on Google, and your profile acts as the first impression of your expertise.
3. Save Money While Reaching Motivated Leads
Unlike paid ads, you don’t have to spend money to show up in local search results. While it takes time and attention to create a standout profile, the leads it generates are absolutely free. When optimized correctly, your profile can bring in calls, messages, website visits, and in-person appointments from people motivated to buy or sell real estate.
4. Share Up-to-Date Info About Your Business
Real estate moves fast. New listings pop up, properties get sold, and market trends shift. Your Google profile lets you share real-time updates, like open houses, new listings, or market insights, so anyone who finds your page knows you’re active and engaged in your community.

How to Set Up Your Google Business Profile
Step 1: Claim Your Google Business Profile
The first step is to make sure you either claim your existing profile or set one up from scratch.
- Go to the Google Business Profile Website: Start by heading to google.com/business and log in using a Gmail address that represents your real estate business. Keep things consistent—use the same Gmail account you use for branding purposes, like email campaigns or social media.
- Search for Your Business Name: Type in your full name or brand name. If Google already created a listing for you, claim it by selecting “Claim this business.” If not, follow the prompt to create a new listing.
- Add Your Address or Service Area: If you work out of an office, input the physical address. If your business operates from home or covers multiple cities, select the option to show your service area instead of your address. Be honest—Google will verify your information, so it needs to reflect where you actually work.
- Pick a Category: You need to pick the most relevant category for your business. For most real estate agents, this will simply be “Real Estate Agent.” If you have additional specialties like rentals or property management, you can add secondary categories.
- Enter Contact Information: Provide your main phone number where clients can reach you. Add your website as well, whether it’s your personal agent page or your brokerage’s official site.
Step 2: Verify Your Business
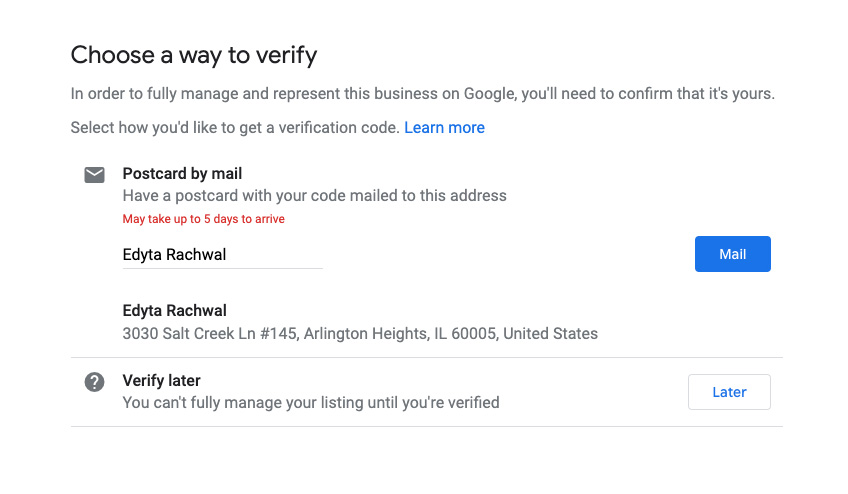
Verification is a required step to make your profile visible in search results and Google Maps. The most common method is through a postcard, but depending on where you are, Google might also offer phone or email verification.
For postcard verification:
- Google will mail you a postcard with a code to the address you listed.
- Once it arrives (it usually takes about five days), log in to your profile and enter the code to complete the process.
This step confirms your profile is connected to a real, trusted business, which helps establish legitimacy with both Google and potential clients.

Step 3: Use Consistent Contact Information Everywhere
Google loves consistency when it comes to your business name, address, and phone number (often called ‘NAP in SEO’).“NAP” in SEO). Your information needs to match across your website, social profiles, directories like Zillow or Realtor.com, and even your local chamber of commerce listing.
For example:
- If you use “Main Street,” don’t abbreviate it as “Main St” in other listings.
- If you have multiple phone numbers, choose one as your official number everywhere.
When Google sees consistent entries, it treats your business as more reliable, which boosts your chances of ranking higher in local searches.
Step 4: Write a Strong Business Description
Your business description is your chance to tell potential clients why they should choose you. Keep it clear, specific, and focused on what makes your services stand out.
Here’s what to include:
- Your local expertise: Mention the cities, neighborhoods, or areas you specialize in.
- Your experience and specialties: Are you great at negotiating deals? Do you focus on first-time homebuyers or luxury properties?
- Keywords that people search for: Naturally work in phrases like “real estate agent in [City name],” or “buying and selling homes.”
Aim to grab attention within the first few sentences. Google shows about 250 characters before someone has to click “Read more,” so make those words count.
Step 5: Add High-Quality Photos and Videos
Real estate is visual, and your Google profile should reflect that. Upload eye-catching images of yourself, your team (if applicable), and the properties you’ve listed or sold. You could also include:
- Professional Headshots: A friendly photo of you helps potential clients feel connected.
- Images of Listings: Post photos of properties you’ve sold or are currently offering.
- Behind-the-Scenes Visuals: Show your personality or process, like setting up an open house or conducting a neighborhood tour.
- Short Videos: A 30-second walkthrough of a home or a quick introduction Short Videos can grab attention.
Use high-resolution images and rename your files to include keywords… (e.g., “real-estate-agent-[CityName]”) for a small SEO boost.

Step 6: Publish Updates and Posts
Your profile lets you share updates in real-time using the “Posts” feature. This keeps your business visible and your audience engaged.
Some ideas for posts include:
- Announcements for upcoming open houses.
- Exciting new listings or recently sold properties.
- Seasonal market tips, like how to prepare a home for winter buyers or trends during spring.
- Testimonials or client stories that highlight your expertise (with permission).
New posts show that you’re an active and involved realtor, which impacts both search rankings and client trust.
Step 7: Focus on Reviews
Reviews are one of the most important parts of your Google reviews profile. Positive, detailed reviews can make the difference between a prospect choosing you or your competitor.
You can grow your review count by:
- Asking directly after a successful transaction. Most clients are happy to leave feedback if asked at the right time.
- Sending follow-up emails with a link to your Google review page. Make it as simple as possible for them to respond.
- Responding to every review—thank happy clients, and acknowledge criticism professionally. How you handle even negative feedback can leave a good impression on other people reading your reviews.
Step 8: Enable Features Like Messaging and Q&A
Messaging allows people to reach out to you directly from your Google profile. Enable this feature so potential clients can text questions without needing to call. The Q&A section also lets you engage clients by answering common real estate questions ahead of time, such as:
- “What neighborhoods do you specialize in?”
- “Do you handle rentals or only sales?”
Take advantage of both features to show responsiveness and professionalism.
Keep Your Google Business Profile Up to Date
Online momentum matters. Commit to regular updates to keep your profile fresh:
- Add new photos of properties you’ve listed or sold.
- Post weekly updates on market trends or announcements.
- Check for new reviews, responding promptly to build client trust.
Final Thoughts
A Google Business Profile is one of the easiest and most effective tools to grow your client base as a realtor. By setting up a complete, consistent, and engaging profile, you increase your visibility, build credibility, and attract motivated buyers and sellers in your local area.
It’s a little effort upfront, but the results—free leads, more calls, and a stronger reputation—are well worth it. Start optimizing your profile today so the next time someone searches for “best realtor near me,” they find you.
Transform your real estate business with a brand-focused website that converts – schedule your free demo today at to see how thousands of successful agents are growing their business online.
