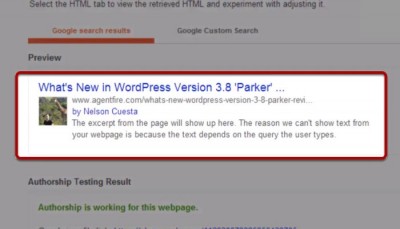
Google Authorship is great for two reasons. Number 1: it’s a positive social indicator. You want to give Google as many reasons to trust your website and the content from your website as possible. This is one very good reason. Number 2: it’s going to increase clicks.
New Agents
Google Authorship will add authority to your content and improve click-through, and it can be added to your website in just a few minutes!
Link to Google Rich Snippet Tool: http://www.google.com/webmasters/tools/richsnippets
Audio Transcription
Hey guys, Nelson Quest here with Agentfire.com and today we’re going to be talking about adding Google Authorship to your website. So for those of you that don’t know what Google Authorship is, it looks a little something like this. Basically, in the Google search results, it’s your photo, which is your Google+ profile photo and your name next to the description of your content.
This is great for two reasons. Number one it’s a positive social indicator. You want to give Google as many reasons to trust your website and the content from your website as possible. This is one very good reason. Number two, it’s going to increase clicks. Posts and pages with Google Authorship are going to appear more authoritative. You’ve probably been more likely to click onto links that have Google Authorship as opposed to ones that don’t. Two very good reasons to make sure that you have Google Authorship set for your WordPress website.
Now to set this up is actually an extremely easy process. It’s really only three steps. We’re going to walk you through that right now. Step one; you’re going to make sure that you have a Google+ profile account. If you don’t know how to do that go ahead and just Google how to create a Google+ profile? This video is assuming that you already know how to do that; you already have a Google+ profile.
Number two, which really is number one, you’re going to add your Google+ profile URL to your WordPress site. To do this log into your website, go to the dashboard. You’re going to navigate down to users and you’re going to click “your profile”. Once you’re on this page look for the contact information heading. You should see a Google field. Go ahead and insert the link to your Google+ profile in this field.
To get the link to your Google+ profile, what you want to do is go to your Google+ profile. In fact, just go to the page. At the top, you should see a URL with a bunch of numbers and at the very end, there should be a /posts. That is the URL that you want. Copy that exactly as is into the Google field in your user profile. We’re 50% of the way there.
Step three; you’re going to add your website as a contributor on Google+. To do this, go ahead and go back to your Google+ profile page. Click on the about tab. Scroll to the links section. Look for the edit button and click that. You should be able to add a new contributor. You’re going to add the URL to your WordPress website. In this example, we have Agentfire.com already added.
Believe it or not, we should be all set. We have included a fourth step in case you want to test to make sure that this was configured properly. You can use Google’s rich snippet tool. We’re going to include a link to that in our YouTube description as well as in the video transcription on our website. Go ahead and click that link and what you want to do is you want to copy and paste the URL from one of your blog posts into the field on this page. Go ahead and hit submit. You should now see your Google authorship showing in the description.
If you don’t see that, don’t freak out. The first thing you should do is retrace these steps to make sure that you have in fact got everything configured properly. If that’s the case, you may want to give it a few days to make sure that it’s propagated. I have heard of situations where this could take up to a few days to propagate.
As always, thanks for watching. Make sure to sign up for our newsletter for awesome Real Estate WordPress related videos and I’ll see you soon!
