Learn how to host Virtual Community Q&As to generate real estate leads with our step-by-step guide to meet new clients in your neighborhood.
Lead Generation
In our current COVID-19 world (as well as the new economy that will emerge from it), it’s more important than ever to make sure you continue to provide value as a real estate professional while doing all you can to protect your clients’ well being, as well as your own.
In past articles, we’ve talked about ways of using technology to run virtual showings and open houses.
Today, we want YOU to take part in hosting your own Virtual Community Q&A as a way to meet new clients in your neighborhood in this new economy. After your virtual community discussion, we’d love to hear about your results from this real estate lead gen strategy we have created.
What all does it entail?
Below we will give you a step-by-step guide in order to run a successful Facebook ad promoting your “Virtual Community Q&A.”
We’ll also provide a guideline of topics to cover during the discussion, and a way to utilize the contacts you have made for your real estate business.
Step 1: Create A Facebook Ad Promoting Your “Virtual Community Q&A”
First, to start advertising your event you must set up an ad through your Facebook Page by following the steps below:
Visit the ad center, then select “create ad”:


When it prompts you, “How would you like to grow your business?” make sure to select “Get More Leads” at the very bottom:

Then it will ask what form you’d like to use, to make things simple, just choose “A form on Facebook”:

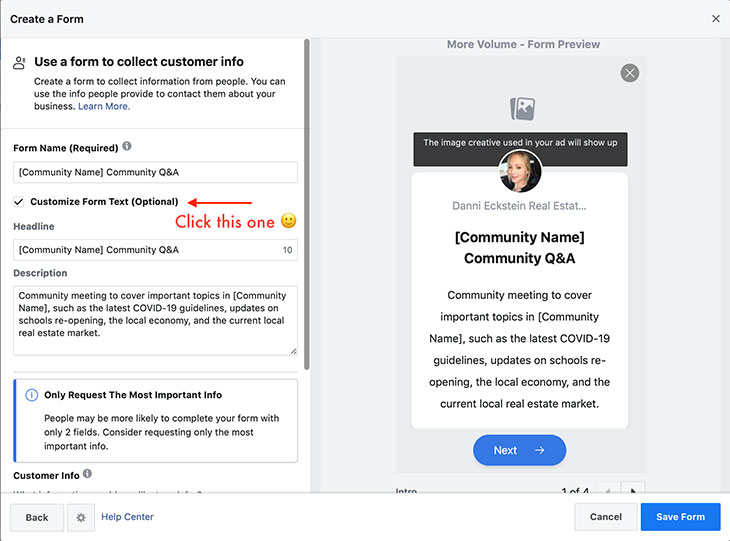
Next, it will ask you to create and name your form, make sure to name your form something like “[Your Community’s Name] Virtual Community Q&A.” Then click “Customize Form Text (Optional)” to give a brief description of the discussion you are trying to get people to sign up for. In mine, I wrote something like:
“Virtual community discussion to cover important topics in [community name], such as the latest COVID-19 guidelines, updates on schools re-opening, the local economy, & the current local real estate market.”
Feel free to modify this as you like, but make sure to keep the topics relevant to your local area, as this will most likely result in more sign-ups.
The Creative
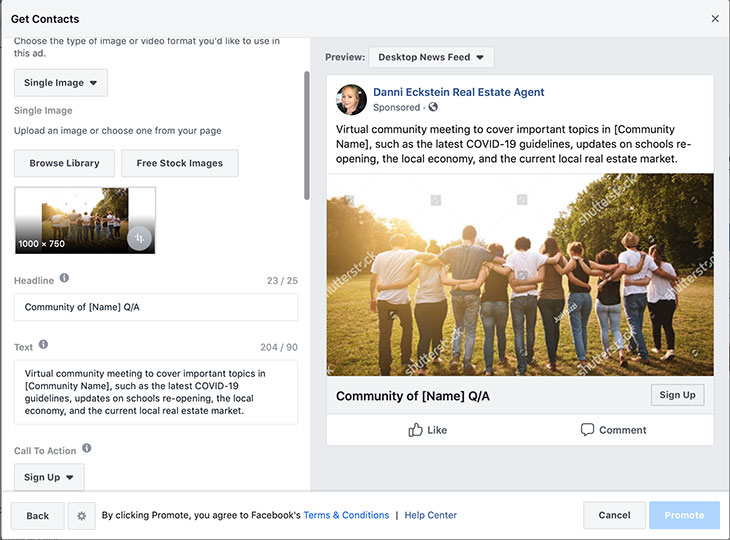
Now for the fun part, the creative portion! In this part, Facebook will ask you whether you want to use a single image or not. For the sake of simplicity and ease, select “single image” unless you have a slideshow or video you’d like to upload.
Facebook now gives you the option to choose from their library of stock photos, so this is what I chose for the ad below. Of course, you are more than welcome to use your own neighborhood picture for something like this as well.
Next, give your ad a catchy and informative “headline” that helps explain the discussion clearly and concisely to your audience (in 25 characters or less.) For this one, I chose “Community of [Your Community Name] Q&A.”
In the “text” box, I copied and pasted my description of the community Q&A (used for the form above):
“Virtual community discussion to cover important topics in [community name], such as the latest COVID-19 guidelines, updates on schools re-opening, the local economy, & the current local real estate market.”
For the “Call-To-Action” option, keep it on “Sign Up” as that is the goal of this ad.
Targeting
Now for the big leagues, setting up “targeting.”
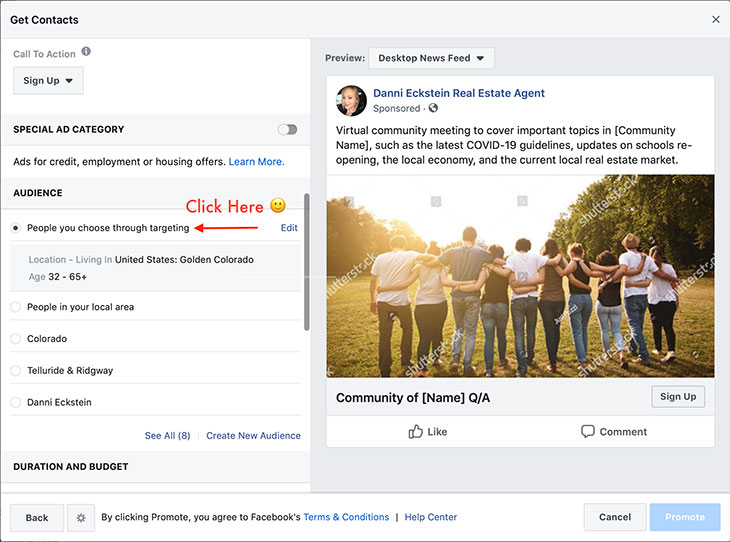
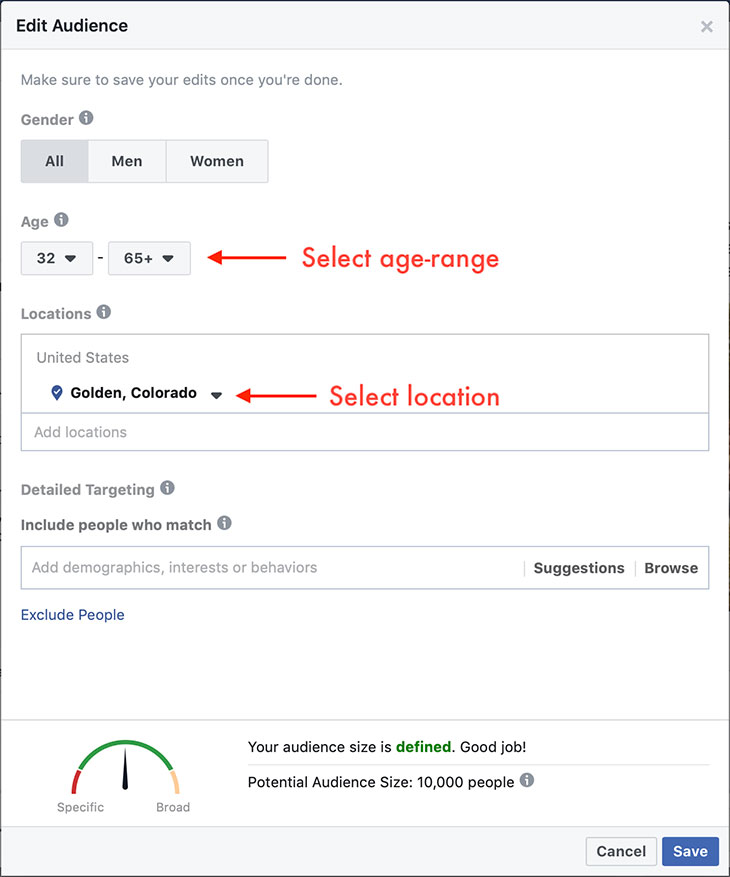
Here I recommend adding the specific town(s) or zip code(s) that you want your ad to appear.
I would also set an age range of 32 to 65+ years so that you’re targeting people who are more likely to be homeowners.
This is nothing a quick Google search can’t fix. For my ad, I chose “age 32-65+” as 32 is the average age of new home buyers nationwide.
Duration And Budget
Once targeting is set-up, now select the length of your campaign and your total and / or daily budget.
I would recommend starting the campaign at least 3-5 days before the scheduled Q&A.
Budget is entirely up to you but we’d recommend a minimum of $100 for the duration of the campaign. (So if you’re running the campaign for 3 days, you can set it to $33/day).
Facebook gives you an estimate of your daily reach based on the daily budget, so if you would like to reach more people in a day, you’ll need to up your budget!
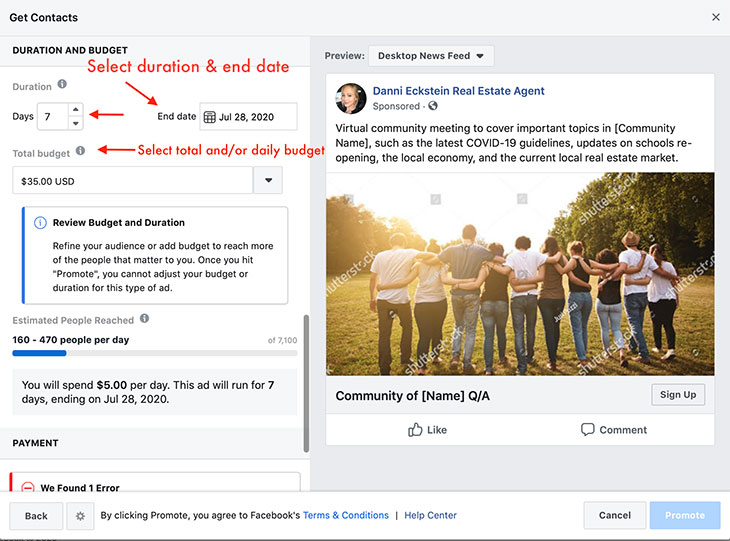
At this point, follow all the necessary steps and you’re ready to go!
Step 2: Access Your Facebook Form Submissions
A helpful guide we found for accessing your Facebook form submissions can be found here.
But for our own quick run-through, here are some screenshots and instructions:
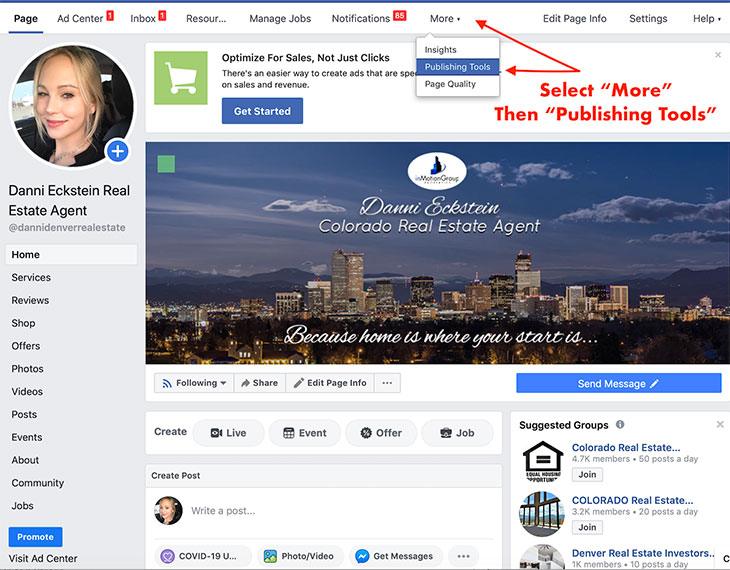
On your Facebook Business page click the “More” option on the top of your screen, then click “Publishing Tools.”
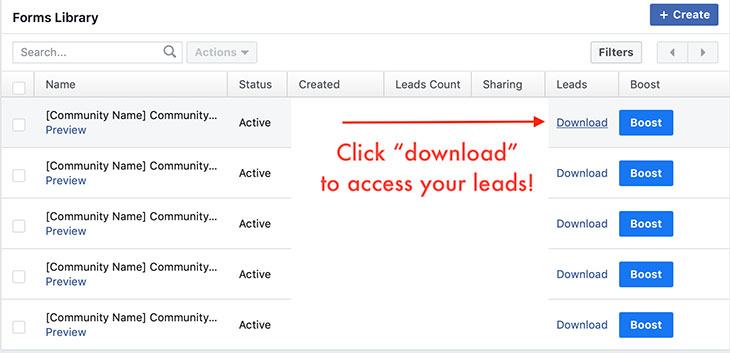
After that, select “Forms Library” on the left hand of your screen:
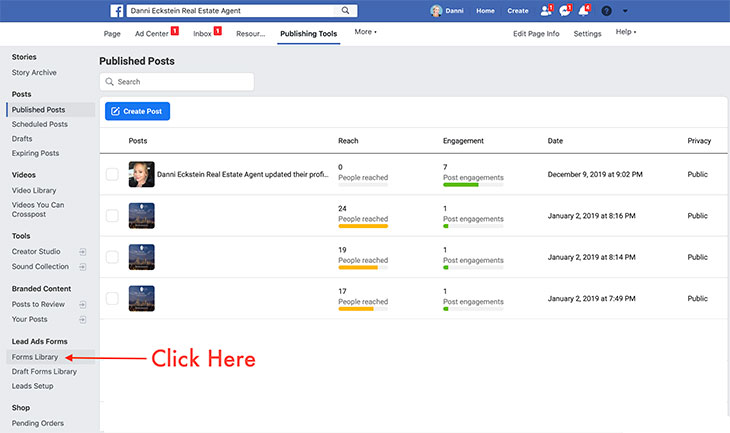
Once your “Forms Library” box pops up, click “download” to access your leads and download either a .CSV or .XLS file.
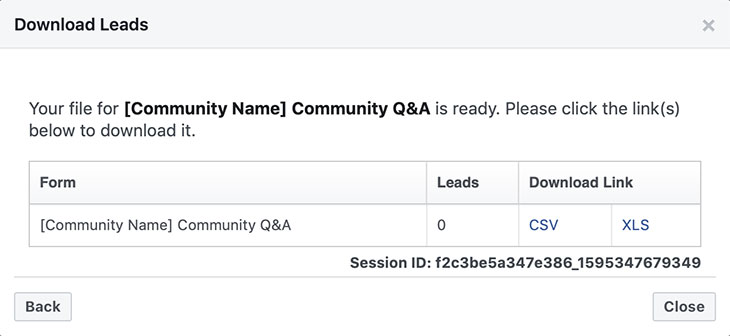
Once you have accessed your Facebook Leads, I would also recommend uploading them into your CRM. This way you can add them to your pipeline. With popular CRMs, there is also a way to integrate them directly with FB leads.
Here are so helpful links below for integrating Facebook Leads with common CRMs:
Follow-Up Boss
LionDesk
TopProducer
Pipedrive
WiseAgent
Contactually
Don’t have a CRM or don’t know where to start? We got you covered 😀. We recently wrote an article about our top 10 favorite CRMs for real estate professionals.
Step 3: Set Up Your Zoom Video Call And Invite Your Facebook Leads!
For this step, visit Zoom.us and click register now on their home page. After you have finished setting up your account, make sure to add a profile picture (to start reinforcing your brand), then click “Schedule A Meeting” in the top right on your screen.
*Note: feel free to use your video conferencing application of choice. For this one, we used Zoom, as it the most widely known & used for these types of meetings.
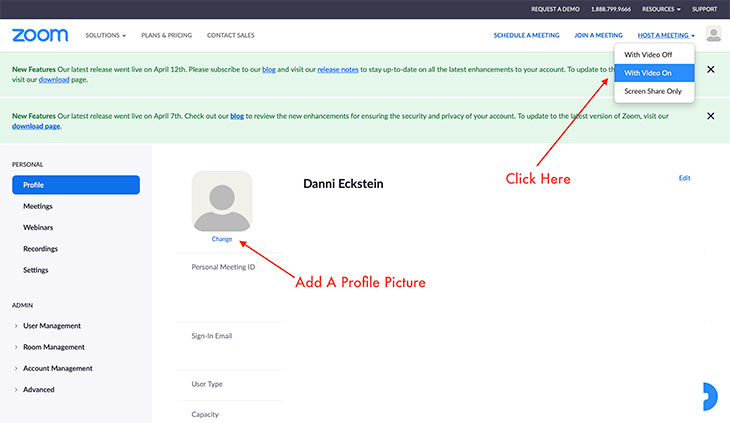
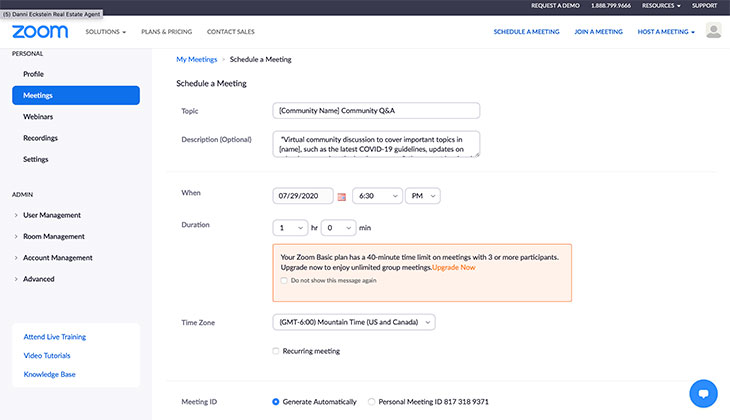
Once you’ve clicked “Schedule A Meeting” fill out necessary meeting information. Feel free to copy and paste the description we have used above. Make sure to set a time and date that is most accommodating to people’s work and life schedules. I would recommend scheduling sometime in the middle of the week and in the evening after work, around 6:30PM in your local timezone.
Upgrade Your Zoom Package
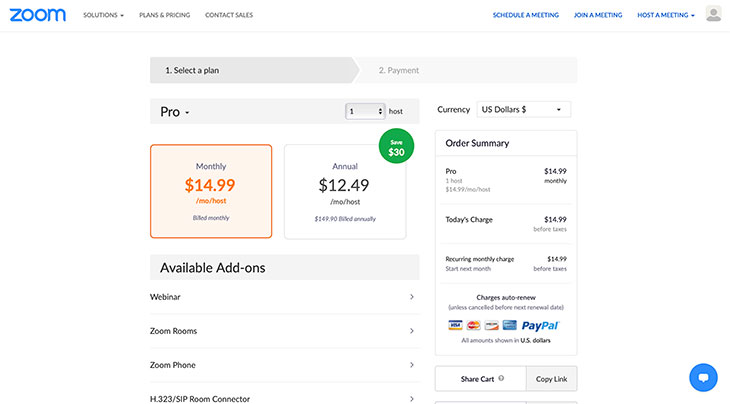
In order to set the meeting for anything over 40 minutes with over 3 attendees, you will need to upgrade your Zoom package to a “Pro” plan costing $14.99 a month. Feel free to set a reminder in your phone to cancel the plan if you no longer wish to use this service, but if your first meeting goes well you may want to continue or even purchase an annual plan for $12.49 a month…. Only time will tell…
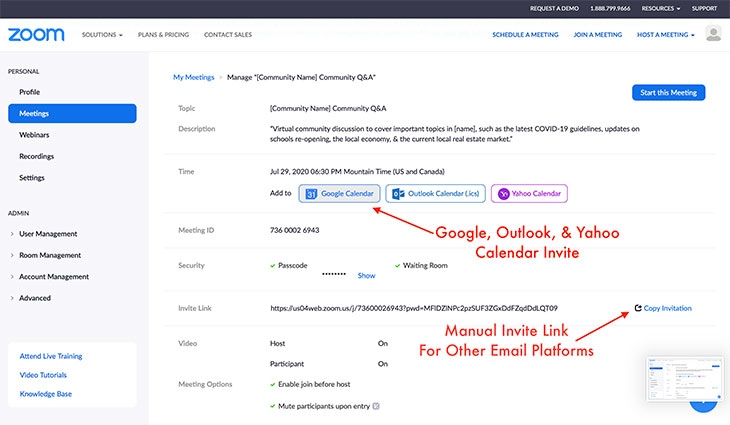
Ok, so once the meeting is set up, now it’s time to create the Calendar Invite in either Google, Outlook or Yahoo. If you don’t have these email platforms, you can copy and paste the event link and meeting info into your email.
Reminders
As soon as you create the invite in your email calendar, the only thing left is to add your attendee’s email from your Facebook leads and to set reminders, reminding your audience periodically about the scheduled time and date of the virtual community Q&A to ensure they don’t forget. Here is how to do that below:
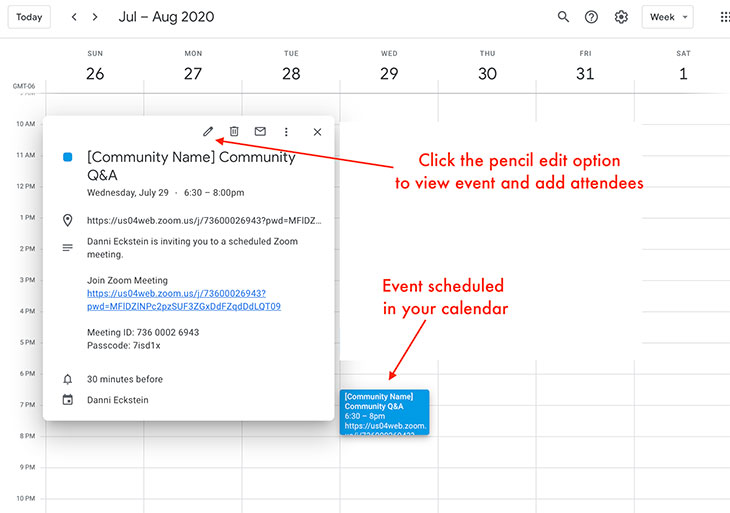
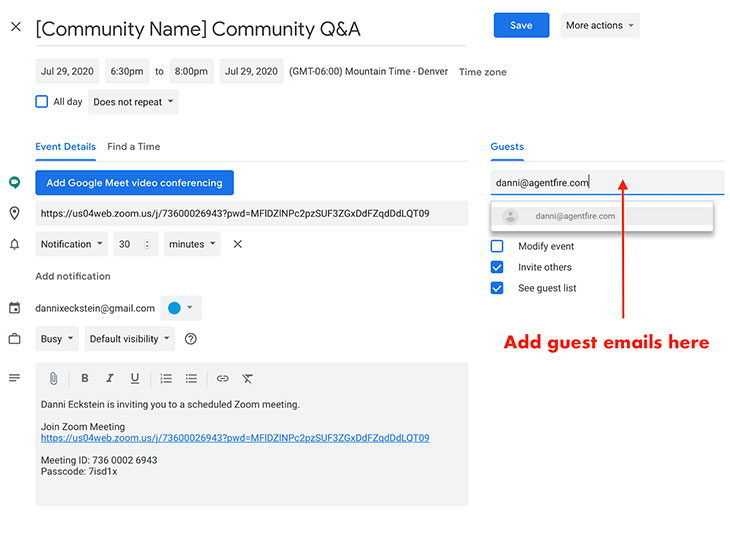
When you click the pencil “edit” icon, this screen will appear, where you can go ahead and add your guest’s email addresses in the bar on the right:
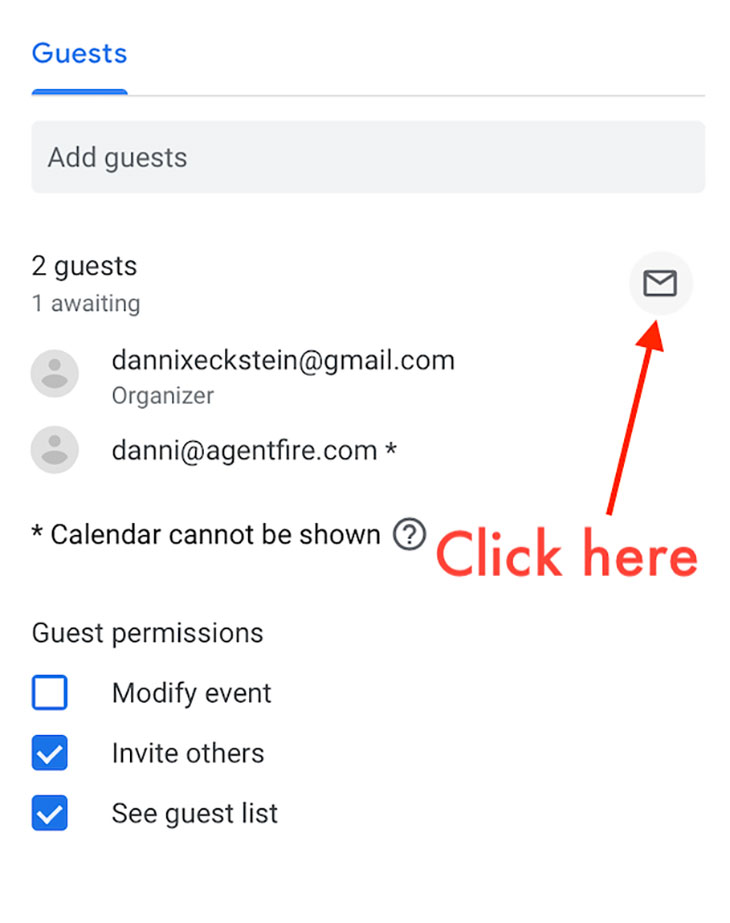
Now that you have added your guests, click the mail icon to send them an email notification:
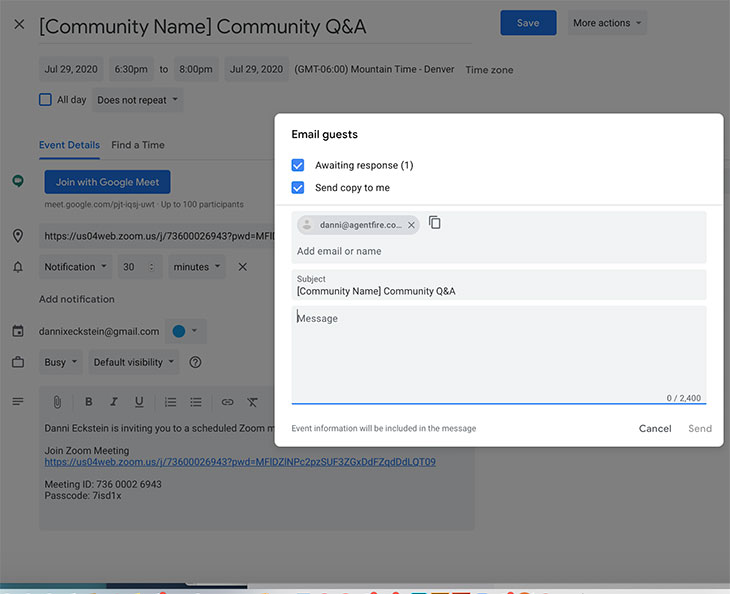
Once you click the mail icon, this screen will appear, allowing you to send your invite as well as a message to all your guests. (I recommend including a modification of the description used prior, as well as some personal touches on it that show your personality.)
After the original invitation has been sent, make sure to set up notifications reminders so this Q&A stays TOP OF MIND to your attendees / potential clients:
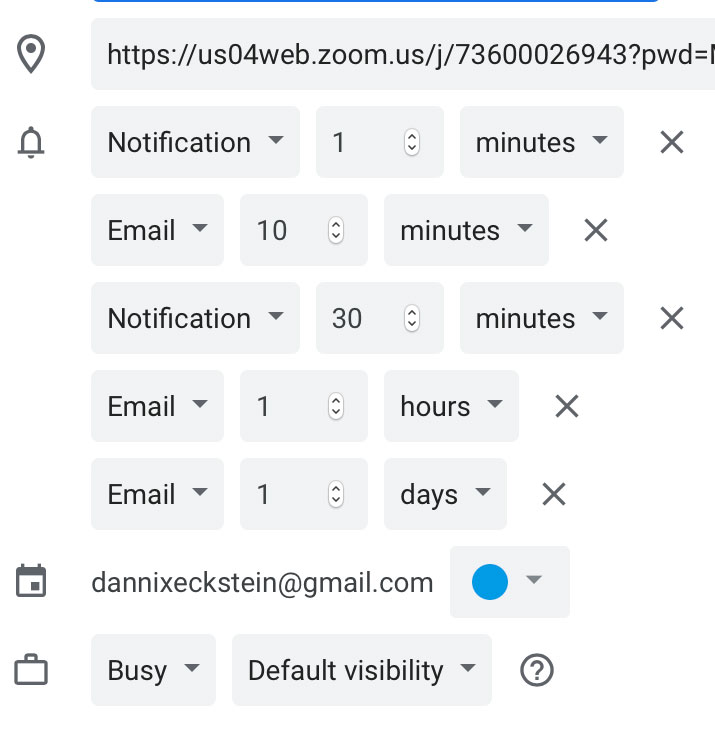
It is entirely up to you how many notifications you want to send out. But here, I recommend timing them out similar to the image above.
Now that your Zoom call is set in stone, and you are patiently awaiting your RSVP’s… it is time to get a plan in place for what discussion topics will be covered and how you will organize (and lead) your meeting.
Step 4: Planning Your Meeting Agenda
The best way to start this process is to identify the most important topics in your community. Once you’ve done this, create an outline organizing these topics. Identify their subtopics, the common questions attached to these topics, and the general flow of the discussion.
A good place to start researching this is your local community new-source and finding potential Facebook groups or online forums specific to your community. (If there are any, this is also a great place to advertise the Community Q&A). Right now, there are a lot of global topics that pertain locally too, which is why I originally suggested the talking points stated previously in our ongoing description.
These include:
- The latest COVID-19 guidelines
- Updates on schools re-opening
- The local economy
- The current local real estate market
Keep It Factual And Unbiased
I would avoid any controversial, divisive, or political discussion, as this can turn a lot of people away. So just keeping things centered arounds facts and information is the best way to go. If people chime in with their opinions and questions I would try to keep your feedback as unbiased as possible.
A great way to research potential questions is on these Facebook groups, forums, or in the comments section of any local online articles you come across. Don’t feel stressed to have every answer out there, as people will be chiming in as well, but it’s a good idea to be as prepared as possible. Also, the more information you are able to give, the better you will look to your new contact list.
Here are some examples of COVID tips and local real estate market updates our clients have done for your reference:
Real Estate Market Update
Step 5: The Follow-Up
- Make sure to send a thank-you email to everyone that attended your meeting, and reach out to gauge their interest in possibly making the community Q&A an ongoing event every 2 weeks or so.
- Regardless of whether they attended 100% of those leads should now be in your CRM database.
- You can get them set up on drip emails, reach out with an offer to have coffee, and talk about their real estate needs, etc.
Endnote:
Now that all of the steps have been covered, please let us know if you are interested in bringing this innovative real estate marketing strategy to the real (virtual) world. In this new economy, we believe it will have an incredibly positive effect on your real estate book of business.
Cheers,
Your Friends At AgentFire
If you want to stay up to date on all of our free and valuable content, subscribe to our newsletter. We publish valuable articles and guides such as this one regularly. That way you can constantly improve your marketing skills, and become a more effective real estate marketer.
And if you want to dominate your hyperlocal real estate market, check out AgentFire’s AgentFire Sites, #1 rated for several years in a row.
