Facebook marketing can deliver massive ROI for real estate agents, but only those who understand how it works. Start leveraging Facebook's marketing tools by creating your own Business Page and optimizing it for conversions.
Lead Generation
If you’re a real estate agent in 2019, you know that the overwhelming majority of your clients use social media… daily! And while new social platforms continue to emerge over the years, Facebook is still the top player.
Simply put — an optimized Facebook Business Page and Facebook Marketing strategy can produce massive ROIs for your real estate business. There’s still plenty of opportunities left for realtors on Facebook, and we’re going to help you get your slice of the pie.
This article is the first in a 6-part series called The Ultimate Real Estate Facebook Marketing Guide, which will show you how to position yourself on Facebook as a local real estate expert and expand your outreach with an ad campaign.
Today you’ll start with the basics, which is how to set up and optimize your Business Page. Throughout the rest of the series, you’ll learn how to launch highly-targeted campaigns for specific hyperlocal niche markets via the Facebook ad platform.
But for now, the bottom line is you need a Facebook page.
How to Create a Facebook Business Page for Real Estate
Facebook isn’t just a platform to share unwanted baby pictures, cringy memes, and diet tips (although, admittedly, it is mostly those things).
It’s also a powerful and surprisingly easy-to-use marketing platform. Facebook lets you create a free Business Page, which you can use as a digital “storefront” for people to find your business online.
Facebook Business Pages allow you to:
- Create highly targeted audiences and run tailored ads to them.
- Establish your social proof with testimonials from happy clients.
- Foster communication with your clients through messaging tools and Call to Action buttons.
And lucky for you, signing up is quick and painless, so without further ado, let’s set up your Facebook Business page. ?
1. Signing Up
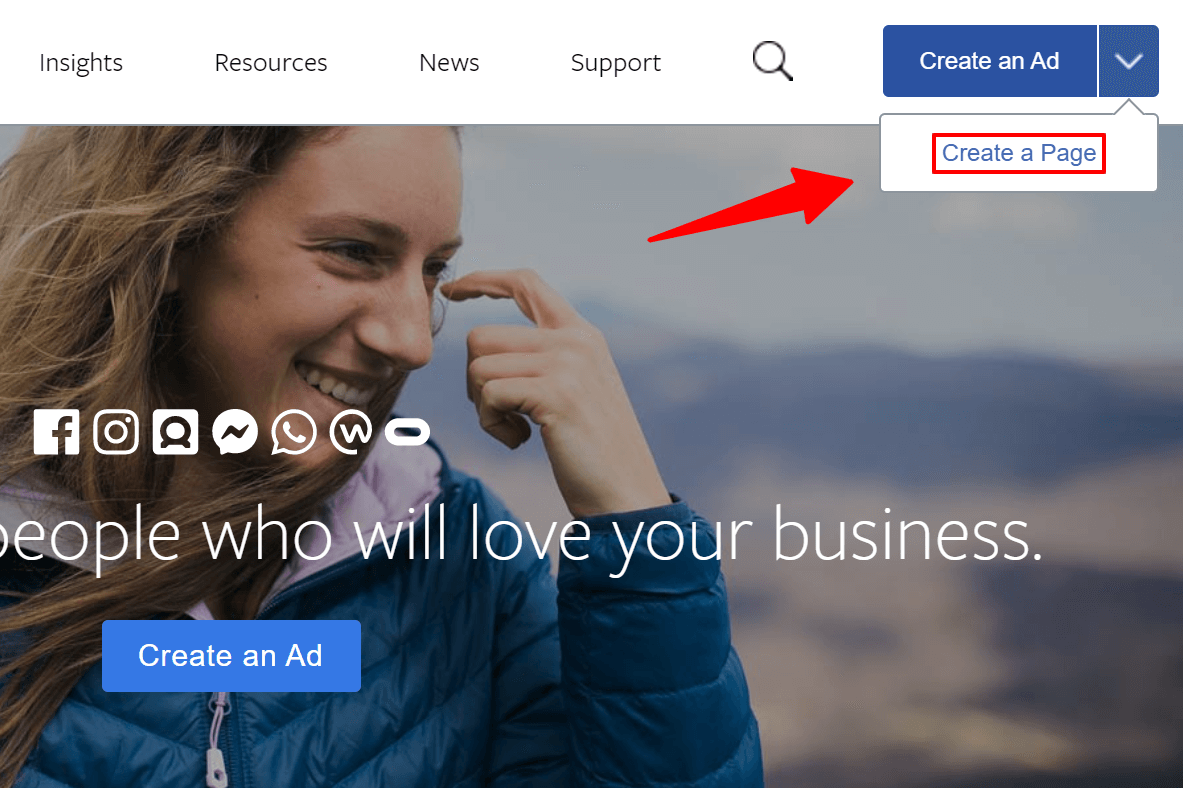
To start, go to Facebook.com/business, and in the top right corner of the homepage, click Create a Page in the dropdown menu.
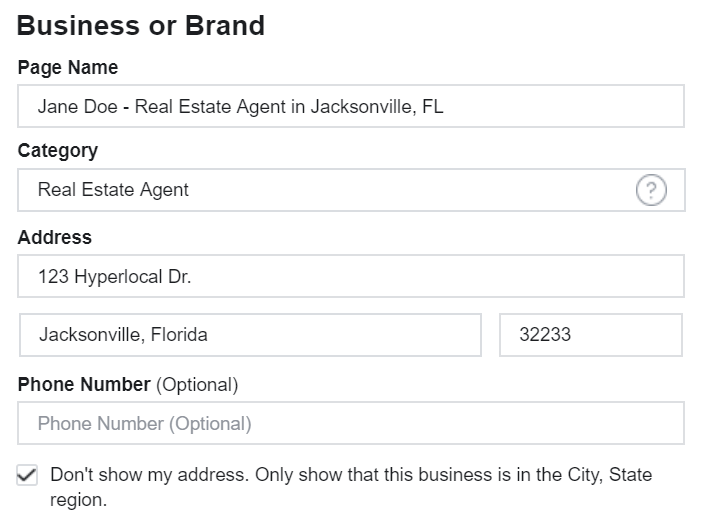
Start by entering your details into the Business or Brand box. Make sure to select Real Estate Agent in the Category dropdown menu.
Add your name, job title, and hyperlocal service area in the Page Name field. Your main goal is to make it easy for visitors to find your page, and understand what your Business Page is for. Use the screenshot below as reference:
When you’re ready, click the Continue button for the next step.
2. Upload your Profile Picture
On the next screen, you’ll upload your profile picture.
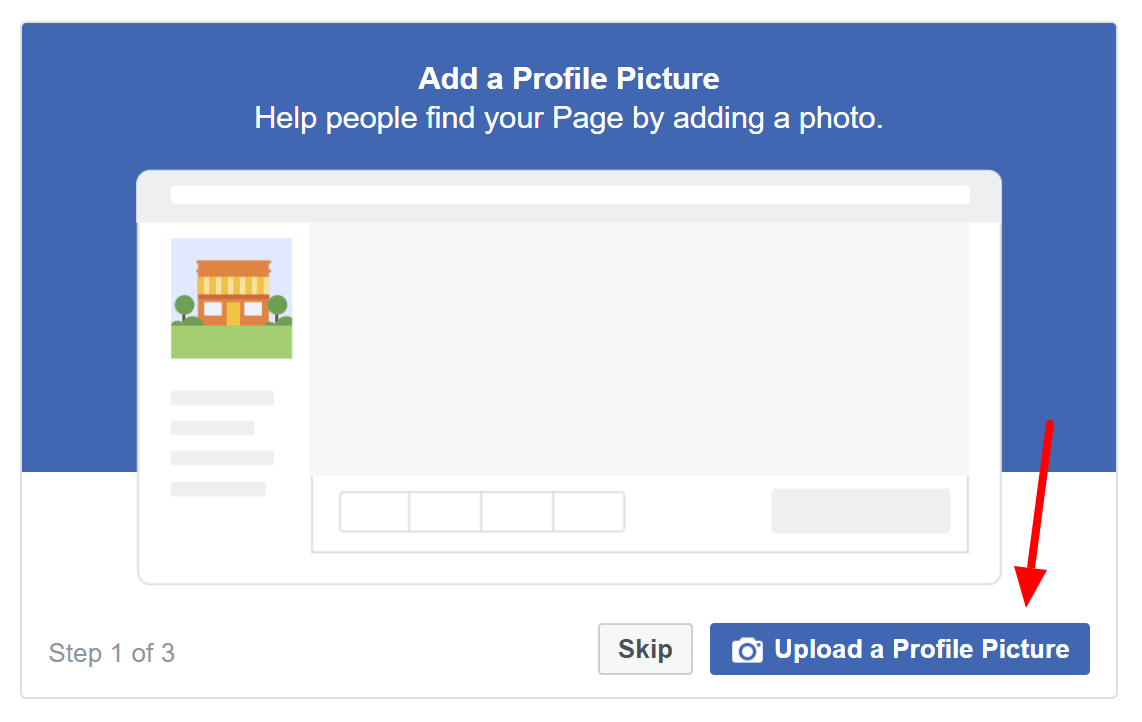
People will see your Profile Picture anytime they’re on your Business Page and whenever you comment or ‘Like’ another post. Unless you’re operating a larger brokerage (where it would make sense to use a logo) — use a picture of yourself.
Ideally, use the same headshot that you’re using in other marketing materials to keep your branding consistent.
3. Create or Order a Professional Cover Photo or Video
The next step is to upload your Cover Photo/Video.
When a potential client reaches your Business Page for the first time, the first thing they see is your Cover Photo/Video. It takes up 33% of their screen and it’s at the very top… Prime digital real estate. ?
If you have the skills to design it yourself (or if you have a graphic designer on your team), this is a great chance to show off your creativity, and bring some of your own personality into your brand. But if that’s not your thing then it would be better to hire a freelancer on Fiverr.com or Upwork.com to design your Cover Photo/Video.
We highly recommend using a smiling photo of yourself and/or your team or an action shot (like at an open house with potential buyers) – which all communicate hyperlocal expertise.
You could also organize your team to meet at a local landmark and use that as your Cover Photo, like The Lanier Property Group:

If you have a cooler idea, it really is unbelievably easy to find someone on Fiverr to help you realize it. Some additional ideas include:
Cover Photo/Video Ideas
- Showcase the amazing view from one of your newest listings.
- Create a slideshow to show multiple images.
- ‘Frame’ your specific hyperlocal focus, niche, or tagline.
- Create a cinematic video of your hyperlocal area.
- Share a beautiful listing video.
At this point, you have a visitor on your page and you’ve greeted them with your Cover Content. Now what? — Make it easy for them to contact you right now with a Call to Action button.
4. Use a Call to Action button for your contact info
Imagine: After months of preparation, one of your Business Page visitors is ready to buy a new home in your service area. They’ve seen the content you’ve posted (we’ll cover content in Step 2 of this series) on your Business Page for the last month. Then one day you post a listing for a home that they absolutely love. ? In fact, they want to talk to you NOW.
Make it as easy as possible for visitors to contact you by setting up your Call to Action button.
Set up your Call to Action (CTA) button so that all your visitors have to do to get in touch with you is click on the familiar Send Message button at the top of your page:
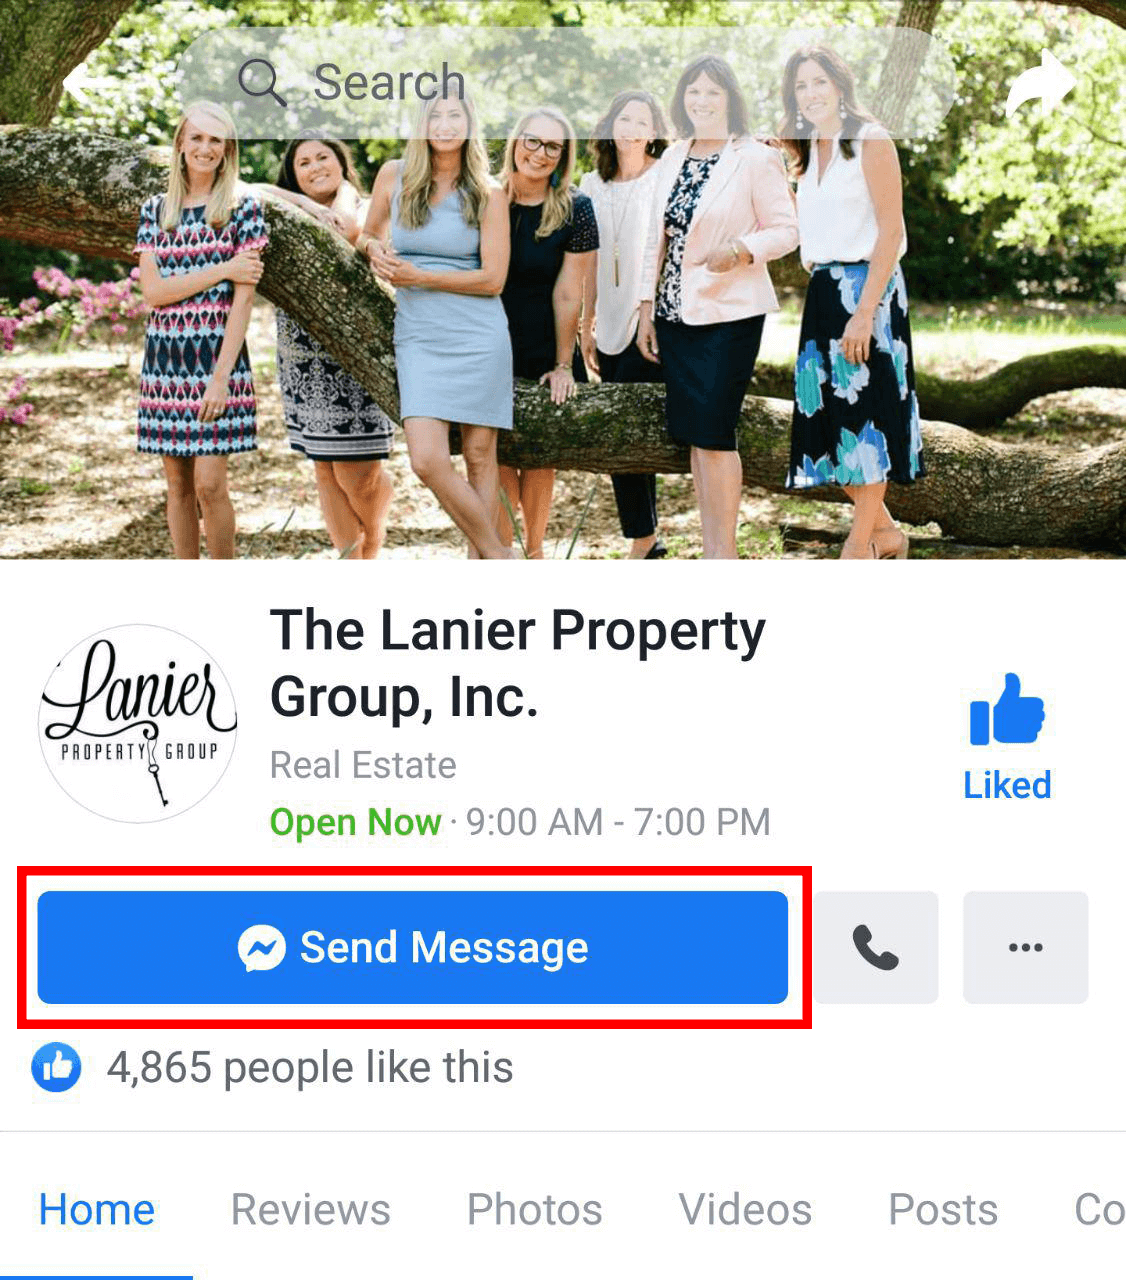
How to set up the Call to Action Button
Log into your Facebook account and go to your Business Page, then find the Call to Action button and click + Add a Button.

As a realtor, it’s almost always best to stick with the Contact you and Book with you options, but you can change it to Send Message, Send Email, or Call Now if it makes more sense.
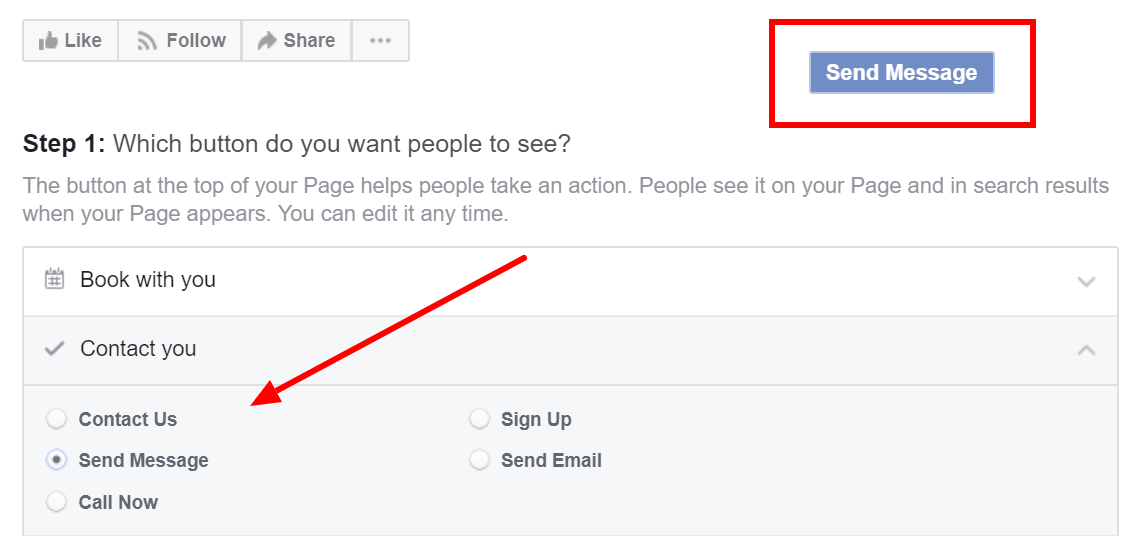
If later on you’re unhappy with your CTA button, don’t worry. You can always come back and adjust it later or change it accordingly while you read through the rest of this series.
In this example, I chose the Send Message CTA Button, so that any message I receive from my visitors goes directly into my Facebook Messenger App. That way I can quickly get messages from clients directly to my smartphone.
5. Order your Tabs like a sales funnel.
Your navigation tabs are located (as a list) underneath your profile picture. They make it easy for visitors to navigate your Facebook Business Page. The order of these tabs is very important, as it determines the layout of your entire Business Page.
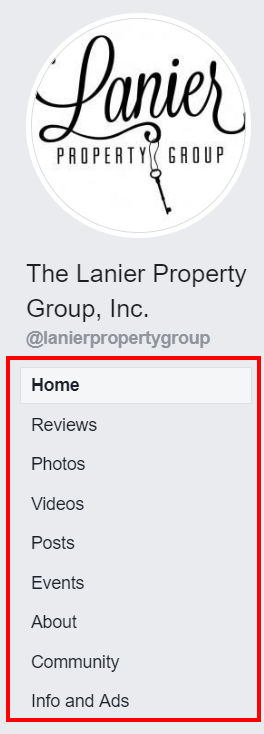
Unlike the hypothetical visitors in the last section (the ones that were ready to ‘Call Now’), your average visitor will be earlier in the home buying process. Why not structure your tabs strategically — as a sales funnel?
That way you can help your visitors find the information they want while simultaneously encouraging them to take actions that will get you more leads.
To reorganize your tabs, go to your Business Page, click Settings, go to Templates and Tabs, then drag and drop your tabs into a strategic order.
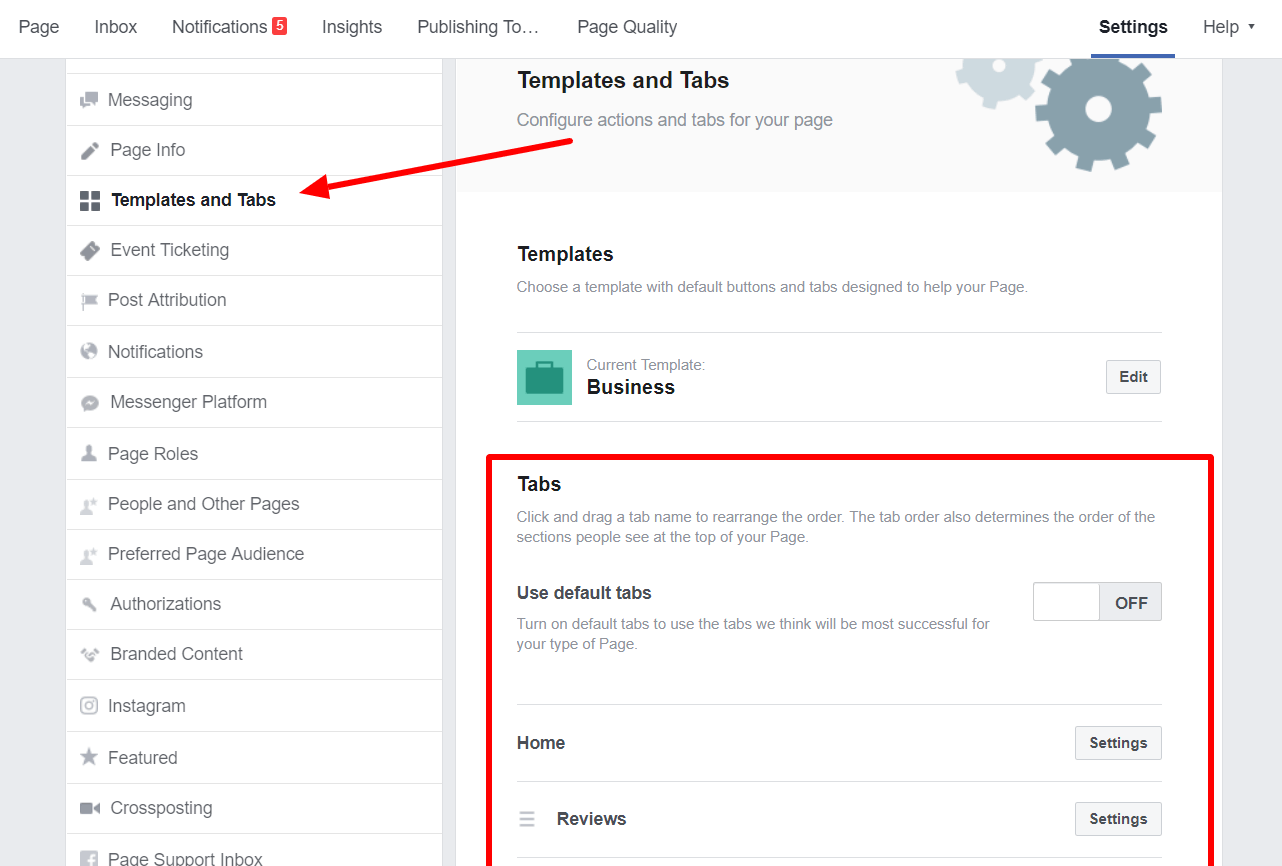
Note that you can turn individual Tabs on/off by clicking the Settings button designated to each tab.
It’s also worth noting that your Tabs should only lead to valuable and relevant content. It’s not a very good look for you when a visitor clicks ‘Videos’ and they get back a long list of nothing. I can’t believe how many times I found that to be the case reviewing real estate Facebook Business pages for this article ?.
Put your Reviews and Recommendations at the top of the list.
Now, more than ever, social proof is one of the most powerful things you can leverage in any marketing effort.
Studies show that 84% of people trust an online review as much as they trust a review from a friend, think about that for a second…
You can put your social proof on display by putting your Facebook Reviews at the very top of your Facebook Business Page:
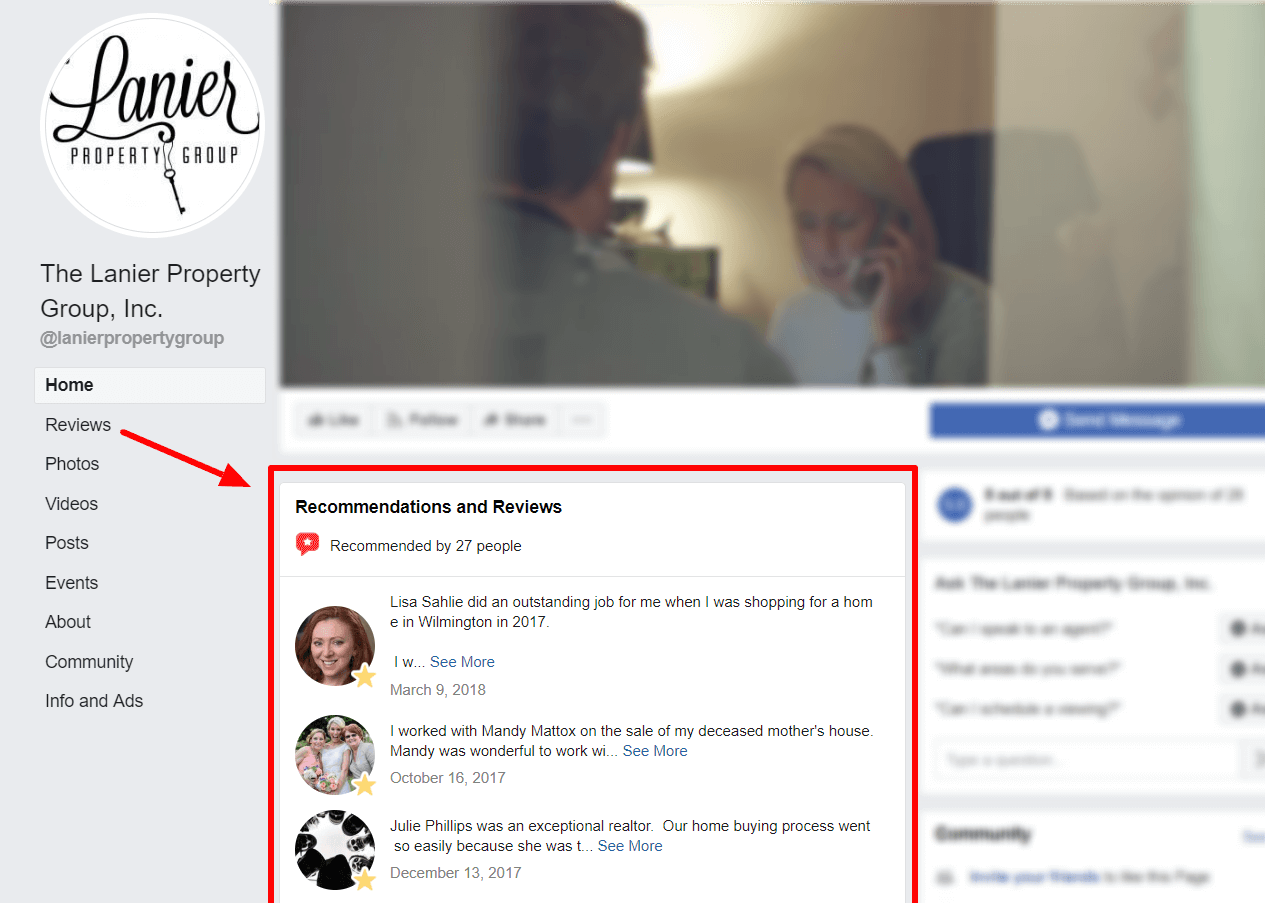
While there are no hard rules for ordering your tabs, if you have good ratings & reviews, those should 100% be placed as close to your Contact Now button as possible and will guarantee maximum conversions…
6. The About Section
The About section is an extremely important section of your Facebook Business page. This section lists all of your contact information, hours of operation, business milestones, etc about your hyperlocal real estate business.
If your visitor is reading your about page, there’s a good chance they’re seriously considering using your services.
The key to leveraging their interest in your About section is to avoid making the section exclusively about you.
Instead, define your brand, address your client’s needs, and direct them to the next step in their home buying/selling journey — all at the same time. You’ll see an example of that below, but first…
How to edit your About page:
Go to your navigation tab, and click on the About tab.
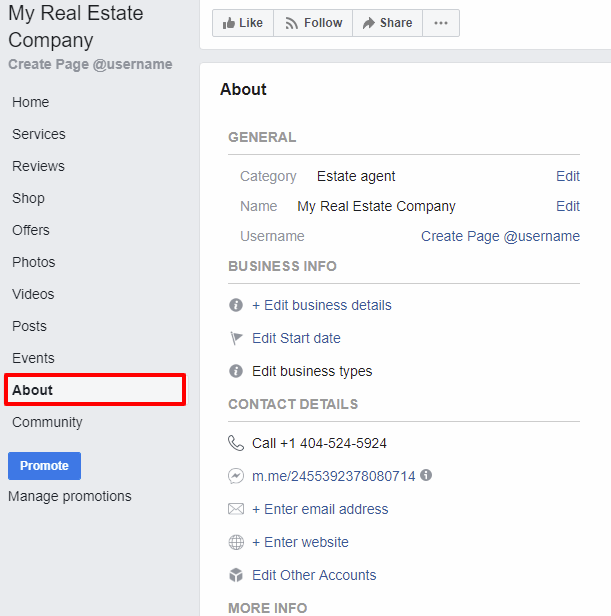
Then click on the “Edit” link for each category you wish to change, and add the right information.
An example of an About Page:
Check out the business details on The Lanier’s Property Group About page.

This About page is a solid example of the mindset you should have when you’re writing anything for your real estate marketing: meet potential homebuyers where they’re at.
Remember that part of a strong brand is consistency. Make sure that the About Page on your Facebook business page matches the one on your website, and your Zillow profile, and anywhere else that people will be learning ‘About’ you.
Also, notice in the previous example that the Lanier Property Group leverages a testimonials link along with some strong social proofs to close out their ‘About’ description. So the text highlights some of their accomplishments while reframing them as an advantage for their clients.
Facebook Vanity URL (aka @username)
By default, Facebook will assign your Business Page a URL that looks like this:
- facebook.com/Hyperlocal-RE-230947230947
Can you imagine trying to tell a potential homebuyer how to reach you on Facebook? ? It’d be a lot easier if you had a clean URL like this:
- facebook.com/hyperlocalREagent
To change your URL, go to your About tab. Under the General section, click ‘Create Page @username’, and enter your business name.
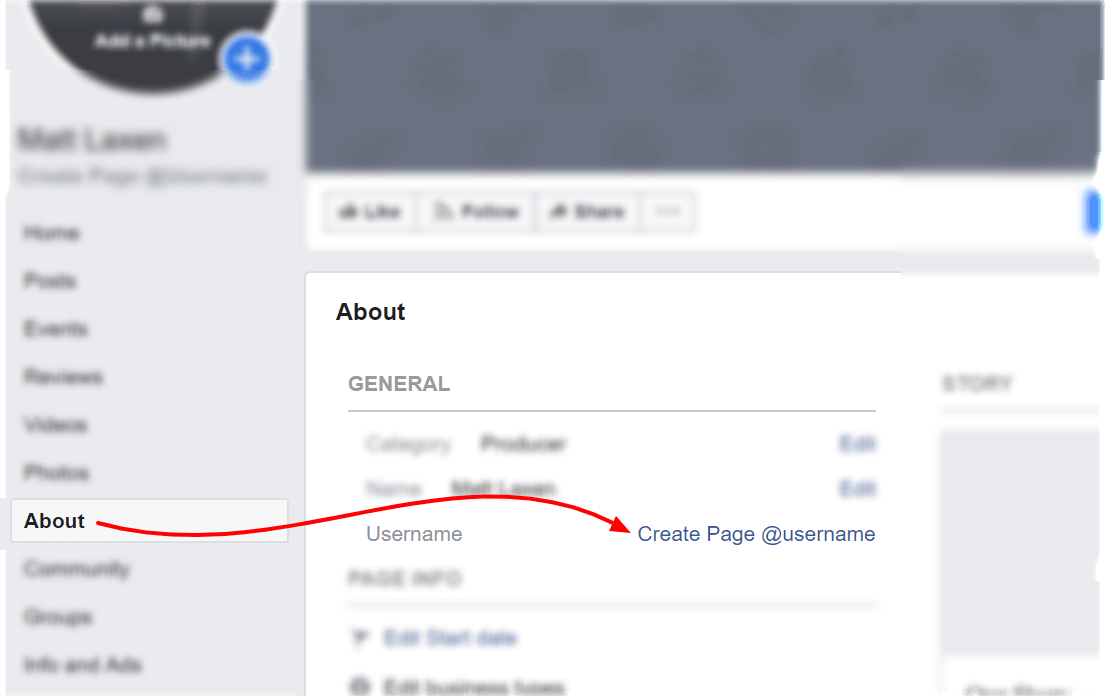
Creating your Page @username (a ‘tag’ or ‘handle’ for your profile) will also set your Business Page’s URL, so…
- If this is your URL: facebook.com/HyperlocalREAgent
- Then this is your @username: @hyperlocalREagent
Keep in mind that you can only change your @username once, and when you do, you need to go back and update every external link pointing to your Facebook Business Page.
Also, if someone else snagged your @username already, you’ll need to come up with something else. Bottom line: make it short, accurate, and easy to verbalize in-person.
If you followed everything in this article, your Facebook Business Page is ready for traffic. But that just begs the question: how will you drive your traffic?
The answer? — Great content and Facebook Ad management, which is what you’ll learn in the next article. Don’t want to miss out? Subscribe to our newsletter and be the first agent in your area to actually understand how to dominate your hyperlocal market through Facebook Marketing.
